
Garage Gym Flooring: Transform Your Garage into a Professional Training Space
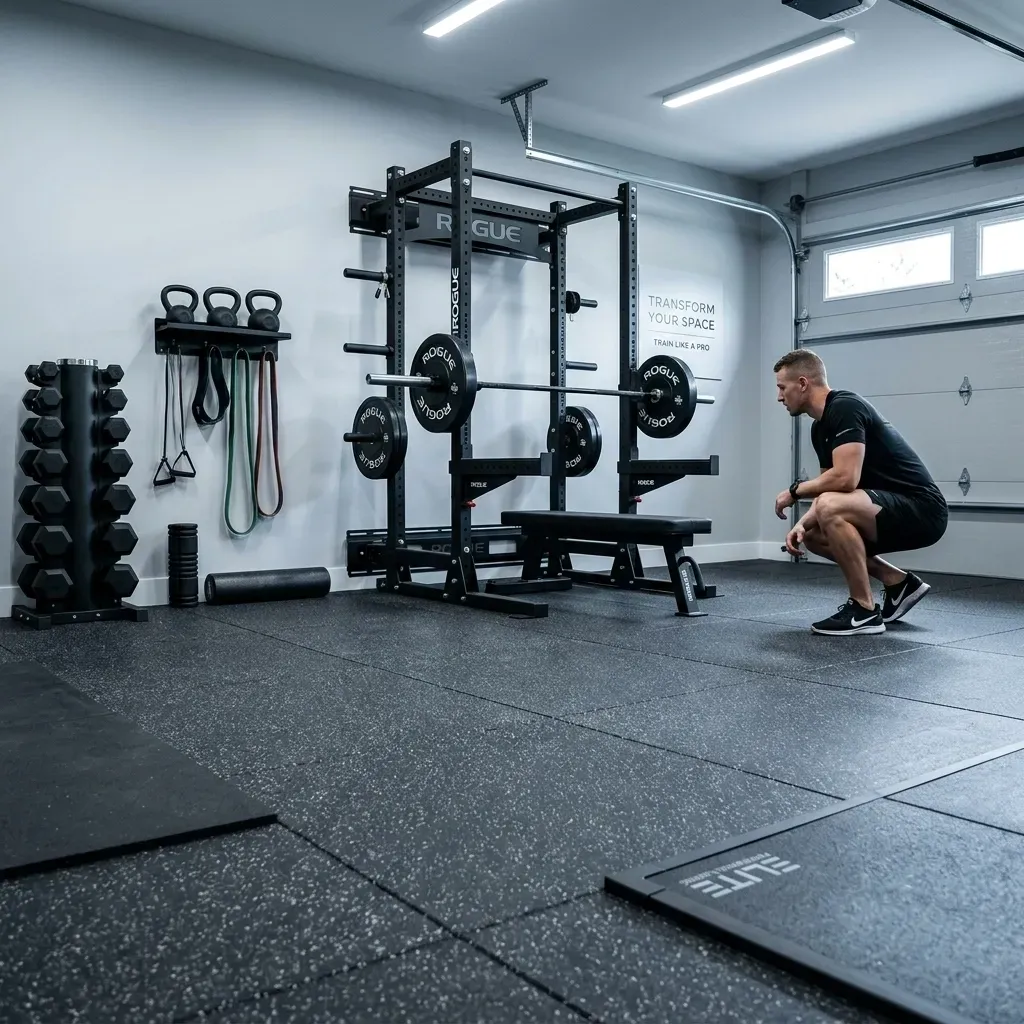
Your garage holds untapped potential. That cold, cluttered space where you park the car could become your personal training sanctuary—no commute, no membership fees, no waiting for equipment, just you and your fitness goals.
But transforming a garage into a functional gym requires more than just moving the car and adding a barbell. Garages present unique challenges: concrete floors, temperature extremes, moisture issues, uneven surfaces, and the practical reality that many need to maintain parking space alongside training area.
This comprehensive guide shows you exactly how to convert your UK garage into a professional-quality training space, with special focus on choosing and installing the right flooring to handle garage-specific challenges.
Understanding Garage-Specific Challenges
Garages weren't designed as training spaces. Addressing their unique characteristics ensures your gym performs well year-round.
The Cold Reality
UK garage temperatures: Can drop to 0-5°C in winter, rise to 25-30°C in summer
Impact on training:
- Cold muscles increase injury risk
- Uncomfortable environment reduces motivation
- Metal equipment becomes painfully cold to touch
- Rubber flooring becomes harder and less shock-absorbent in extreme cold
Impact on flooring:
- Temperature fluctuations cause expansion and contraction
- Adhesive performance compromised in cold conditions
- Some flooring materials become brittle below 5°C
Solutions:
- Insulation (walls and garage door)
- Heating options (electric heaters, infrared panels)
- Appropriate flooring that tolerates temperature variation
- Training time planning (afternoons in winter when slightly warmer)
Moisture and Dampness Issues
Common garage moisture problems:
- Concrete slab "sweating" (condensation from temperature differences)
- Rising damp through concrete without proper damp-proof membrane
- Rainwater entry under garage door
- Condensation from vehicle brought in wet
- Poor ventilation creating humidity buildup
Impact on flooring:
- Mold and mildew growth underneath flooring
- Adhesive failure if flooring is glued down
- Unpleasant odors
- Health concerns from mold exposure
- Flooring degradation and reduced lifespan
Solutions:
- Moisture barrier installation under flooring
- Interlocking tiles rather than glued (allows air circulation)
- Improved ventilation (air bricks, extractor fans)
- Dehumidifier during wet months
- Weatherproofing garage door seal
Uneven and Damaged Concrete
Typical garage floor issues:
- Cracks from age and settlement
- Oil stains from vehicles
- Uneven surface from poor original pour
- Sloped floor for drainage (common in older garages)
- Flaking or spalling concrete surface
Impact on flooring:
- Rubber flooring conforms to surface irregularities
- Severe unevenness creates unstable training surface
- Cracks can telegraph through thinner flooring
- Slope affects squat rack stability and barbell rolling
Solutions:
- Fill major cracks with concrete filler
- Self-leveling compound for significant unevenness
- Thicker flooring (15-20mm) bridges minor irregularities
- Plywood sub-base layer for severely damaged floors
- Professional assessment for structural concerns
Measuring and Planning for Dual-Use Spaces
Many garage gyms must accommodate both training and vehicle parking. Strategic planning makes this work.
Space Assessment
Measure carefully:
- Internal dimensions (length, width, height)
- Garage door width and height
- Window locations and sizes
- Electrical outlet positions
- Water pipes or drains
- Built-in storage or utilities
Vehicle footprint (if maintaining parking):
- Small car: approximately 4m × 1.8m
- Medium car: approximately 4.5m × 1.8m
- Large car/SUV: approximately 5m × 2m
- Allow 30-50cm clearance around vehicle for opening doors
Equipment space requirements:
- Power rack: 2.4m × 2.4m minimum (including bar clearance)
- Bench: 2m × 1m
- Olympic platform: 2.4m × 2.4m
- Cardio equipment: varies, but plan 2m × 1.5m per machine
- Storage: wall-mounted solutions save floor space
Three Common Layout Strategies
Option 1: Dedicated Gym (Full Conversion)
- Vehicle permanently parked elsewhere
- Maximum training space (entire garage floor)
- Best equipment layout flexibility
- Highest investment in flooring and climate control
- Best long-term training environment
Option 2: Split Space (Permanent Division)
- Flooring covers 50-70% of garage
- Vehicle parked on remaining concrete
- Clear boundary between zones
- Equipment permanently positioned
- Good balance of functionality
Option 3: Flexible Layout (Removable/Moveable)
- Equipment on wheels or easily moved
- Vehicle parks on flooring when needed
- Training happens when vehicle is out
- Requires disciplined setup/pack-down routine
- Lowest commitment and investment
Clearance Calculations
Vertical clearance (critical for overhead movements):
- Minimum for overhead pressing: 2.4m
- Comfortable for pull-ups: 2.6m+
- Standard UK garage height: 2.1-2.3m (often insufficient)
If garage height is limiting:
- Focus on powerlifting movements (no overhead work)
- Lower ceiling fixtures and garage door track (expensive modification)
- Accept limitations and train overhead movements elsewhere
- Choose specialized equipment (shorter pull-up bars, etc.)
Door clearance:
- Standard garage door track protrudes 10-15cm into garage
- Thick flooring reduces available height further
- Measure carefully before ordering equipment
- Consider platform positioning away from door area
Climate Control Essentials
Comfortable temperature transforms training experience and protects equipment.
Insulation Priorities
Insulation impact:
- Reduces heat loss by 50-70%
- Maintains more stable temperatures
- Makes heating/cooling more effective and economical
- Reduces condensation issues
Where to insulate first (priority order):
- Garage door (biggest heat loss area):
- Insulated garage door panels (professional installation)
- DIY insulation boards attached to existing door
- Insulated garage door blanket
- Improves temperature by 5-8°C alone
- Walls:
- Cavity wall insulation if walls are cavity construction
- Insulated plasterboard on internal face
- Insulation boards with foil backing
- Creates better training environment
- Ceiling (if garage has one):
- Loft insulation above garage
- Insulated ceiling boards
- Prevents heat rising and escaping
Cost-effective insulation:
- Start with garage door (best return on investment)
- DIY insulation boards: accessible project for most homeowners
- Professional insulation: better performance but higher cost
Heating Options
Electric panel heaters:
- Wall-mounted, out of the way
- Quick warm-up time
- Thermostat control
- Running cost moderate
- Best for: Pre-heating before training sessions
Infrared heaters:
- Heat objects and people, not air
- More efficient than convection heating
- Pleasant warmth during training
- Higher initial cost, lower running cost
- Best for: Regular training in cold months
Oil-filled radiators:
- Portable and moveable
- Gentler, longer-lasting heat
- Safe around equipment
- Slow to heat space initially
- Best for: Maintaining background temperature
What NOT to use:
- Gas heaters (moisture and ventilation issues)
- Open flame heaters (safety concern)
- Very cheap fan heaters (fire risk, inefficient)
Ventilation Requirements
Why ventilation matters:
- Training generates heat and humidity
- Poor ventilation causes condensation
- Stale air reduces motivation and performance
- Prevents moisture damage to flooring and equipment
Ventilation solutions:
- Air bricks in walls (passive ventilation)
- Extractor fan with humidity sensor
- Opening door/windows when weather permits
- Dehumidifier during wet seasons
Flooring for Partial vs Full Garage Conversions
Your flooring approach depends on how much garage space you're dedicating to training.
Full Garage Conversion Flooring
Coverage: Entire garage floor from wall to wall
Advantages:
- Complete protection of concrete
- Seamless training environment
- Professional appearance
- Freedom to position equipment anywhere
- Protects against all moisture issues
Recommended products:
Premium approach: Pavigym Endurance 7mm throughout
- Superior durability for long-term use
- Excellent shock absorption
- Professional performance
- Justifies investment for dedicated gym
Balanced approach: GFS Connect Tiles 15mm for main area, thicker tiles for lifting zones
- Optimizes investment
- Maximum protection where needed
- Good overall performance
Budget approach: Pavigym Extreme 7mm throughout
- Adequate protection and performance
- Accessible entry point
- Upgrade zones later as budget allows
Partial Garage Flooring
Coverage: Defined training area, concrete remains for parking/storage
Planning considerations:
- Define exact training zone dimensions
- Allow 20-30cm buffer beyond equipment footprint
- Use straight lines for clean appearance
- Position to avoid vehicle traffic patterns
Recommended dimensions (common configurations):
Power rack setup: 3m × 3m minimum
- Accommodates rack, barbell, small storage
- Leaves space for vehicle parking
- Cost-effective flooring coverage
Extended training zone: 4m × 3m
- Rack, bench, small cardio area
- More versatile training options
- Still maintains parking capability
L-shaped configuration: Utilizes corner
- Maximizes training space
- Keeps vehicle path clear
- Efficient use of garage shape
Edge finishing:
- Ramps and edge strips create professional transition
- Prevents tiles shifting or lifting
- Safer vehicle access if driving over edge
- Cleaner appearance
Temporary/Moveable Flooring
For flexible dual-use:
Interlocking tiles advantage: Completely removable if needed
- Disassemble when reclaiming full garage
- Take with you if moving house
- Reconfigure if changing equipment layout
Installation approach:
- No adhesive (fully floating installation)
- Interlock tiles securely
- Heavy equipment provides stability
- Quick setup and removal possible
Best products for temporary use:
- Interlocking rubber tiles 15-20mm
- Avoid glued installations
- Choose easy-clean surfaces
Dealing with Garage Door Clearance
Garage doors create unique challenges for equipment positioning and flooring thickness.
Understanding the Clearance Problem
Standard UK garage door:
- Up-and-over doors: track protrudes 10-20cm into garage when open
- Roller doors: less intrusion, typically 5-10cm
- Sectional doors: minimal intrusion when fully open
Flooring thickness impact:
- 15mm flooring reduces available height by 15mm
- 20mm flooring reduces by 20mm
- Platform construction can reduce by 40-60mm
- May affect door operation or create trip hazard
Solutions for Door Clearance Issues
Option 1: Keep flooring away from door area
- Leave 50-100cm gap between flooring and garage door
- Concrete remains in door zone
- Easier vehicle entry/exit
- Slightly less cohesive appearance
Option 2: Edge ramping
- Install edge ramps at door threshold
- Smooth transition for vehicles
- Protects flooring edge
- Professional finish
Option 3: Thin flooring in door zone
- Use 6-10mm flooring within 1m of door
- Thicker flooring in main training area
- Minimizes height change
- Maintains protection near entrance
Option 4: Adjust door mechanism
- Raise door track (professional modification)
- Accommodates thicker flooring throughout
- Expensive but permanent solution
- Not always feasible with existing door
Equipment Positioning Strategy
Keep tall equipment away from door:
- Position power racks minimum 1.5m from door
- Pull-up bars and overhead press areas in garage center
- Bench press and lower equipment can be closer
Overhead clearance map:
- Measure ceiling height at multiple points
- Account for door track intrusion
- Mark zones suitable for overhead movements
- Plan equipment placement accordingly
Budget Garage Gym Flooring Options
Building a garage gym doesn't require enormous investment. Smart choices deliver excellent results on modest budgets.
Budget Flooring Strategies
Strategy 1: Minimal Coverage, Maximum Protection
Cover only essential training zones:
- 2.4m × 2.4m deadlift/squat platform: 20mm shock-absorbing tiles
- Surrounding area: bare concrete acceptable initially
- Expand coverage as budget allows
- Protects most important area from day one
Strategy 2: Basic Coverage, Upgrade Zones Later
Full coverage with budget tiles, upgrade high-stress areas:
- Initial: 7-10mm recycled rubber tiles throughout
- Later: Replace lifting zones with premium 20-22mm tiles
- Provides immediate protection, improves over time
- Budget-friendly phased approach
Strategy 3: DIY Platform Construction
Build your own platform:
- Materials: plywood, rubber horse stall mats, wood screws
- Total investment significantly less than premium tiles
- Excellent performance for serious lifting
- DIY-friendly weekend project
- Tutorial available online
Strategy 4: Mixed Flooring Approach
Different flooring for different zones:
- Premium tiles in deadlift/drop zones
- Mid-range tiles for general training area
- Basic mats or even concrete in low-impact zones
- Optimizes investment across space
Budget-Saving Tips
Timing purchases:
- Watch for seasonal sales
- Order during promotional periods
- Consider slight color variations for discounted stock
Accurate measuring:
- Measure twice, order once
- Minimize waste from over-ordering
- Account for cuts and edge pieces in calculations
DIY installation:
- Interlocking tiles are genuinely DIY-friendly
- Save professional installation costs
- Invest time instead of money
- Satisfaction of self-built gym
Phased expansion:
- Start small, expand gradually
- Proves concept before major investment
- Spreads cost over time
- Allows budget to recover between phases
Premium Garage Gym Transformation Examples
For inspiration, here's what's possible with proper planning and investment.
Example 1: The Complete Home Powerlifting Gym
Garage size: 6m × 3m single garage Use: Dedicated training space, no vehicle parking Investment level: Premium
Flooring solution:
- Pavigym Endurance S&S 22mm in 3m × 3m central lifting zone
- Pavigym Endurance 7mm in surrounding areas
- Total coverage: 18m²
Additional features:
- Full insulation (walls, door, ceiling)
- Infrared heating panels
- LED lighting upgrade
- Wall-mounted storage for plates and bars
- Dedicated ventilation system
Result: Professional-standard training environment, handles 200kg+ lifts, comfortable year-round use
Example 2: The Functional Fitness Garage
Garage size: 6m × 6m double garage Use: Partial conversion, maintains parking for one vehicle Investment level: Mid-range
Flooring solution:
- Pavigym Motion 9mm in 4m × 5m training zone (20m²)
- Pavigym Extreme S&S 22mm in 2m × 2m barbell zone
- Vehicle parking on concrete in remaining 2m × 6m area
Additional features:
- Garage door insulation
- Portable electric heater
- Upgraded lighting
- Pull-up bar mounted to ceiling joists
- 3m × 1.5m turf section for sled work
Result: Versatile training space for HIIT, Olympic lifting, and functional fitness while maintaining practical vehicle parking
Example 3: The Budget-Conscious Starter Gym
Garage size: 5m × 3m single garage Use: Flexible use, removable gym setup Investment level: Budget
Flooring solution:
- DIY platform: 2.4m × 2.4m (plywood and rubber mats)
- GFS Connect Tiles 15mm in additional 2m × 2m cardio zone (4m²)
- Remaining concrete left bare
Additional features:
- Basic insulation (garage door only)
- Portable heater for winter use
- DIY lighting upgrade
- Wall-mounted barbell storage
- Foldable bench and squat stands
Result: Functional training space for serious lifting and cardio, minimal investment, expandable over time
Step-by-Step Garage Conversion Guide
Ready to transform your garage? Follow this systematic approach.
Phase 1: Planning and Preparation (Week 1-2)
Step 1: Assess your space
- Measure internal dimensions precisely
- Note height restrictions and door clearances
- Identify moisture issues or structural concerns
- Determine dual-use requirements
Step 2: Define your training priorities
- Powerlifting, Olympic lifting, CrossFit, general fitness?
- Equipment list and space requirements
- Realistic training frequency and commitment
Step 3: Set budget
- Flooring investment
- Climate control needs
- Lighting and electrical
- Equipment purchases
- Realistic contingency (10-15% extra)
Step 4: Plan layout
- Sketch floor plan to scale
- Position major equipment
- Define flooring coverage areas
- Identify electrical and lighting needs
Phase 2: Preparation Work (Week 2-3)
Step 5: Declutter and clear
- Remove all items from garage
- Sort: keep, donate, discard
- Organize storage for items remaining
- Deep clean entire space
Step 6: Address structural issues
- Fill cracks in concrete
- Repair damaged areas
- Apply self-leveling compound if needed
- Let repairs cure fully (follow product guidelines)
Step 7: Moisture treatment
- Test concrete for moisture issues
- Apply moisture barrier if needed
- Improve ventilation (air bricks, fans)
- Address water entry points
Step 8: Insulation installation
- Insulate garage door (DIY or professional)
- Add wall insulation if budget allows
- Seal gaps and drafts
- Creates more comfortable environment
Phase 3: Infrastructure Upgrades (Week 3-4)
Step 9: Electrical work
- Hire qualified electrician for new outlets
- Position outlets for equipment needs
- Consider dedicated circuits for heating
- Ensure compliance with regulations
Step 10: Lighting upgrade
- LED panels or strip lights
- Bright, even illumination (minimum 500 lux)
- Position to avoid shadows at equipment
- Consider natural light optimization
Step 11: Climate control installation
- Mount heaters in safe positions
- Install any ventilation equipment
- Set up dehumidifier if needed
- Test systems before flooring installation
Phase 4: Flooring Installation (Week 4-5)
Step 12: Final floor preparation
- Clean concrete thoroughly (sweep and vacuum)
- Ensure completely dry
- Check level across entire area
- Mark layout lines for flooring placement
Step 13: Install flooring
- Start from corner as per product instructions
- Work systematically across space
- Cut edge pieces precisely
- Ensure tight interlocking connections
- Install edge strips or ramps as needed
Step 14: Quality check
- Walk entire floor checking for irregularities
- Verify all tiles properly connected
- Ensure no rocking or movement
- Clean surface thoroughly
Phase 5: Equipment Setup and Final Touches (Week 5-6)
Step 15: Install major equipment
- Position power rack or squat stands
- Level and secure as needed
- Install pull-up bars or ceiling-mounted equipment
- Position bench and accessories
Step 16: Organization systems
- Wall-mounted plate storage
- Barbell holders and hooks
- Dumbbell racks
- Accessory storage solutions
- Keep walkways clear and safe
Step 17: Final touches
- Motivational posters or signage
- Mirror installation (optional)
- Sound system setup
- Training log and tracking system
- Fire extinguisher and first aid kit
Step 18: Enjoy your gym!
- Inaugural training session
- Share on social media
- Invite training partners
- Commit to regular use
Maintenance for Garage Gym Longevity
Proper maintenance keeps your garage gym performing optimally.
Daily Maintenance (5 minutes)
- Sweep or vacuum flooring
- Wipe down equipment
- Return weights to storage
- Visual check for any issues
Weekly Maintenance (15 minutes)
- Mop flooring with appropriate cleaner
- Deep clean equipment
- Check all connections and bolts
- Inspect flooring for damage
Monthly Maintenance (30 minutes)
- Detailed flooring inspection
- Lubricate equipment as needed
- Check climate control systems
- Organize storage areas
- Address any emerging issues
Seasonal Maintenance
Winter:
- Monitor heating efficiency
- Check for condensation issues
- Ensure door seals preventing drafts
- Adjust ventilation for moisture control
Summer:
- Ensure adequate ventilation
- Check for overheating issues
- Monitor flooring for any heat-related changes
- Clean thoroughly to prevent odor buildup
Making Your Garage Gym Dreams Reality
Transforming your garage into a functional training space is completely achievable with proper planning and the right approach.
Essential takeaways:
✓ Address garage-specific challenges (temperature, moisture, concrete condition) before installing flooring ✓ Measure carefully and plan layout considering dual-use requirements if needed ✓ Choose appropriate flooring for your training style, budget, and garage conditions ✓ Invest in basic climate control for year-round usability ✓ Start with essentials, expand and upgrade over time ✓ Proper installation and maintenance ensures long-term performance
Ready to build your garage gym?
Explore our complete home gym flooring range, or contact our team for personalized advice on flooring selection, quantities needed, and installation guidance specific to your garage dimensions and training goals.
Your perfect training space is one garage conversion away.
Last updated: February 2026
The Gym Flooring Hub